[TOC]
1. 项目背景
1.1 项目描述
利用内核ebpf机制,实现通过ebpf修改寄存器的接口并给出demo,后续基于该工作,可以进一步通过ebpf实施内核故障注入方案。
后续如果进展顺利的话,可以考虑一下其他的功能,比如用户态的指定函数修改,指定内存地址修改,通过替换PC的方式替换函数等。
1.2 产出标准
参考bpf_override_return接口(位于kernel/trace/bpf_trace.c),编写用于修改其他寄存器的ebpf helper接口
编写使用该接口的demo程序,用于修改函数调用的入参寄存器
代码合入指定仓库指定分支
提供测试报告,确定测试符合预期
1.3 相关仓库
仓库:https://gitee.com/openeuler/kernel.git 分支:openEuler-22.09
https://gitee.com/openeuler/kernel/tree/openEuler-22.09/
2. 技术方法及可行性
2.1 ebpf 相关
此前一直在学习ebpf机制并且编写ebpf相关的程序,用到的框架有:
BCC
libbpf-bootstrap(BPF-CORE)
将
samples目录下的部分程序移植到Android上
之前以经提取过的信息有:
| 子系统 | 提取信息 |
| :------- | ------------------------------------------------------------ |
| 进程 | - cpu占用
- 调度延迟
- 调度队列长度 |
| 内存 | - 内存申请延迟
- 缺页中断进程
- swap进程 |
| 文件系统 | - 进程读写文件次数及数据量 |
| I/O | - top5进程I/O吞吐量
- I/O 延迟 |
| 网络 | - TCP,UDP的上下行流量
- TCP,UDP的上下行丢包率
- 网络延时 |
所以对于ebpf机制以及ebpf程序的使用上是比较了解的
2.2 寄存器相关-X86
如下图所示,可以看到如果要修改入参的话,需要考虑到入参的个数和寄存器位置:
unsigned long di;unsigned long si;unsigned long dx;unsigned long cx;
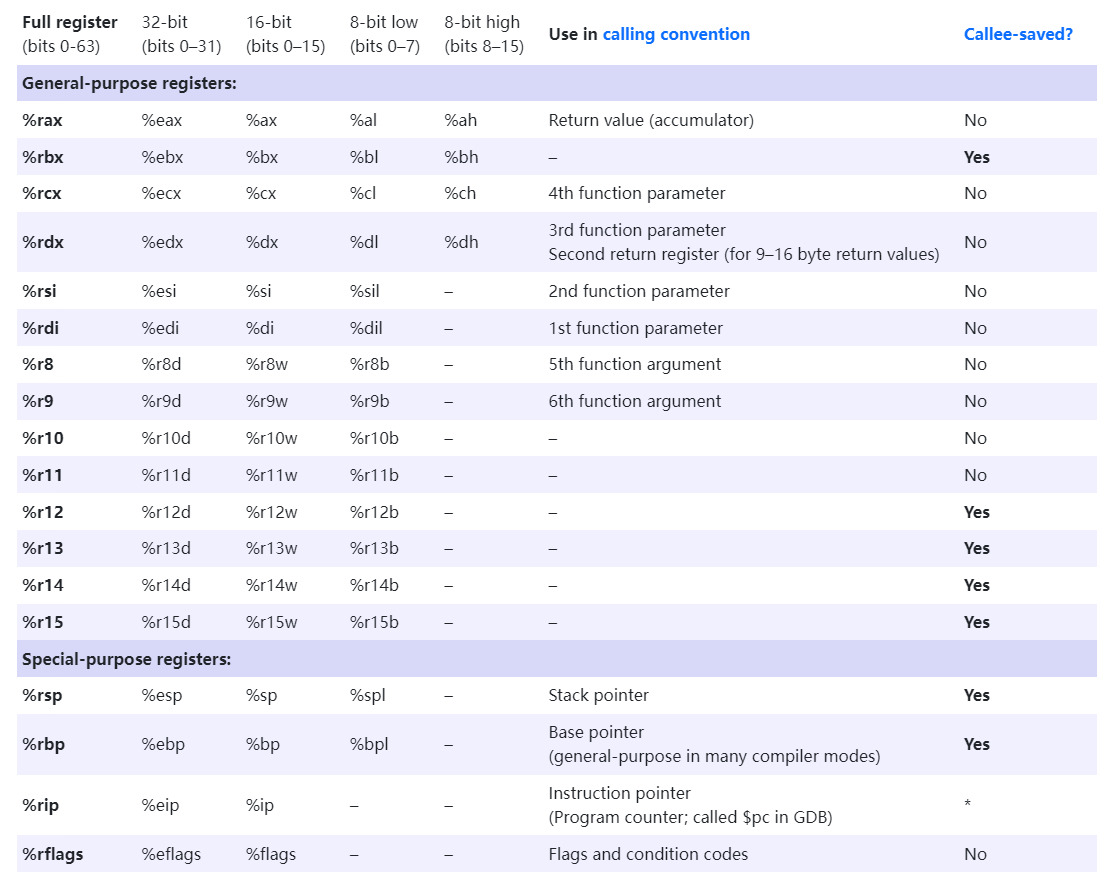 image-20220421113134688
3. 项目实现细节
下列所有的源码分析都是基于 linux-5.15
3.1 bpf_override_return分析
3.1.1 概述
可以从官方解释中看到其函数作用:
long bpf_override_return(struct pt_regs *regs, u64 rc)
 /* 	Description
 * 		Used for error injection, this helper uses kprobes to override
 * 		the return value of the probed function, and to set it to *rc*.
 * 		The first argument is the context *regs* on which the kprobe
 * 		works.
 *
 * 		This helper works by setting the PC (program counter)
 * 		to an override function which is run in place of the original
 * 		probed function. This means the probed function is not run at
 * 		all. The replacement function just returns with the required
 * 		value.
 *
 * 		This helper has security implications, and thus is subject to
 * 		restrictions. It is only available if the kernel was compiled
 * 		with the **CONFIG_BPF_KPROBE_OVERRIDE** configuration
 * 		option, and in this case it only works on functions tagged with
 * 		**ALLOW_ERROR_INJECTION** in the kernel code.
 *
 * 		Also, the helper is only available for the architectures having
 * 		the CONFIG_FUNCTION_ERROR_INJECTION option. As of this writing,
 * 		x86 architecture is the only one to support this feature.
 * 	Return
 * 		0
 */
可以看到这个函数是用来错误注入的,它使用kprobes 覆盖被探测函数的返回值,将其设为rc
第一个参数是 kprobe 工作的上下文 struct pt_regs
这个程序是通过将PC(即程序计数器)设置为覆盖函数,这个覆盖函数代替原来的探测函数运行。
也就是说被探测的函数根本没有运行,而是由覆盖函数返回了所需的返回值。
可以从上面看到,这个辅助函数的安全隐患是比较大的,所以如果你想使用的话,有一些限定条件:
仅在使用 CONFIG_BPF_KPROBE_OVERRIDE 配置选项编译内核时可用,并且仅适用于内核代码中带有 ALLOW_ERROR_INJECTION 标记的函数
仅适用于具有 CONFIG_FUNCTION_ERROR_INJECTION 选项的体系结构
在 Linux-4.19 及之前只有X86支持这个功能,但是在5.15上支持的架构还是比较多的
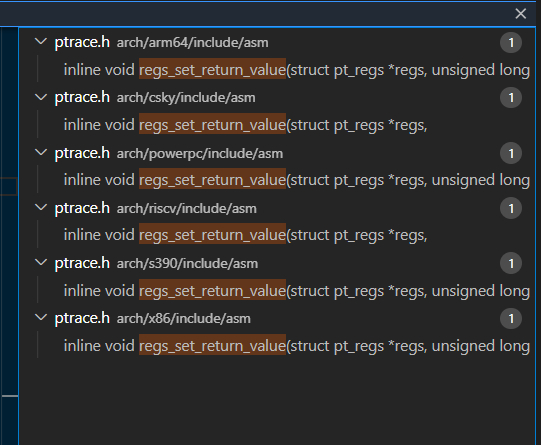 image-20220524105121269
3.1.2 具体函数实现
其调用关系如下,主要就是修改ax(即函数返回值)的值和程序计数器(上面提到的PC是非intel厂家对IP的称呼,也就是CS:IP):
bpf_override_return
	-->regs_set_return_value
	-->override_function_with_return
//kernel/trace/bpf_trace.c
BPF_CALL_2(bpf_override_return, struct pt_regs *, regs, unsigned long, rc)
{
	regs_set_return_value(regs, rc);
	override_function_with_return(regs);
	return 0;
}
//arch/x86/include/asm/ptrace.h
static inline void regs_set_return_value(struct pt_regs *regs, unsigned long rc)
{
	regs->ax = rc;//修改ax
}
//arch/x86/lib/error-inject.c
asmlinkage void just_return_func(void);

asm(
	".text\n"
	".type just_return_func, @function\n"
	".globl just_return_func\n"
	"just_return_func:\n"
	"	ret\n"
	".size just_return_func, .-just_return_func\n"
);

void override_function_with_return(struct pt_regs *regs)
{
	regs->ip = (unsigned long)&just_return_func;//通过嵌入汇编 修改ip
}
3.1.3 ALLOW_ERROR_INJECTION宏
通过将函数加入ALLOW_ERROR_INJECTION,使得该函数可以被bpf_override_return 改写返回值
//include/asm-generic/error-injection.h
#define ALLOW_ERROR_INJECTION(fname, _etype)
static struct error_injection_entry __used
	__section("_error_injection_whitelist")
	_eil_addr_##fname = {
		.addr = (unsigned long)fname,
		.etype = EI_ETYPE_##_etype,
	};
其实就是定义了一个 error_injection_entry 结构体,这个结构体实现的很简单,只有两个变量:
struct error_injection_entry {
	unsigned long	addr;
	int		etype;
};
其中 addr 是函数地址 ,etype是类型,将其函数加入 error_injection 白名单
3.2 tracex7_kern.c 分析
3.2.1 kern.c
//samples/bpf/tracex7_kern.c
#include <uapi/linux/ptrace.h>
#include <uapi/linux/bpf.h>
#include <linux/version.h>
#include <bpf/bpf_helpers.h>

SEC("kprobe/open_ctree")
int bpf_prog1(struct pt_regs *ctx)
{
	unsigned long rc = -12;//定义需要修改的返回值

	bpf_override_return(ctx, rc);//直接调用 bpf_override_return
	return 0;
}

char _license[] SEC("license") = "GPL";
u32 _version SEC("version") = LINUX_VERSION_CODE;
可以看到,他这里挂载的函数是open_ctree,是btrfs文件系统中的一个函数
open_ctree()打开文件,然后读取文件最前面的ctree_header得到root结点所在的块,然后初始化一个内存对象tree_buffer指向这个块,然后初始化radix tree。
这个函数的大概如下:
//fs/btrfs/disk-io.c
int __cold open_ctree(struct super_block *sb, struct btrfs_fs_devices *fs_devices,char *options)
{
    ...
}
ALLOW_ERROR_INJECTION(open_ctree, ERRNO);
可以看到最后是有一个ALLOW_ERROR_INJECTION宏,这个宏声明了该函数可以被bpf_override_return 改写
3.2.2 user.c
//samples/bpf/tracex7_user.c
#define _GNU_SOURCE

#include <stdio.h>
#include <unistd.h>
#include <bpf/libbpf.h>

int main(int argc, char **argv)
{
	struct bpf_link *link = NULL;
	struct bpf_program *prog;
	struct bpf_object *obj;
	char filename[256];
	char command[256];
	int ret = 0;
	FILE *f;

	if (!argv[1]) {
		fprintf(stderr, "ERROR: Run with the btrfs device argument!\n");
		return 0;
	}

	snprintf(filename, sizeof(filename), "%s_kern.o", argv[0]);//拿到*_kern.o的具体名称
	obj = bpf_object__open_file(filename, NULL);//获取 *_kern.o
	if (libbpf_get_error(obj)) {
		fprintf(stderr, "ERROR: opening BPF object file failed\n");
		return 0;
	}

	prog = bpf_object__find_program_by_name(obj, "bpf_prog1");//找到kern.o中的 bpf_prog1 字段
	if (!prog) {
		fprintf(stderr, "ERROR: finding a prog in obj file failed\n");
		goto cleanup;
	}

	/* 加载BPF程序 */
	if (bpf_object__load(obj)) {
		fprintf(stderr, "ERROR: loading BPF object file failed\n");
		goto cleanup;
	}

	link = bpf_program__attach(prog);//attach bpf 程序
	if (libbpf_get_error(link)) {
		fprintf(stderr, "ERROR: bpf_program__attach failed\n");
		link = NULL;
		goto cleanup;
	}

	snprintf(command, 256, "mount %s tmpmnt/", argv[1]);//
	f = popen(command, "r");
	ret = pclose(f);

cleanup:
	bpf_link__destroy(link);
	bpf_object__close(obj);
	return ret ? 0 : 1;
}
3.3 bpf_override_regs 实现
将其定义为
bpf_override_regs,意思是修改寄存器的值。
#define FUNC_PARM 		 0 //只修改入参,计划支持修改三个入参
#define FUNC_RETURN 	 1 //只修改返回值
#define FUNC_PARM_RETURN 2 //修改入参+返回值
/**
 * bpf_override_regs - 修改指定的寄存器
 * @regs:	寄存器上下文
 * @flags:	注入模式,可取 FUNC_PARM、FUNC_RETURN、FUNC_PARM_RETURN
 * @...:	暂时采用可变形参的方式
 */
int bpf_override_regs(struct pt_regs *regs, int flags, ...)
{
    ...
}
目前实现的是内核态指定函数的寄存器上下文修改,如果只是要修改函数调用的入参寄存器,可以通过修改标志位的方式,计划最多支持三个入参的修改,返回值的修改其实原理跟上述是一样的,主要分为两个步骤:
修改寄存器
修改PC值
但是有几个问题需要确定:
返回值只有一个寄存器ax,但是入参的话可能会有多个,这个可能需要其他方式,比如用宏来区分一下。
bpf_override_return是通过白名单的方式来验证函数是否可以attach,考虑是否直接套用已经实现的方式,或者自己实现类似机制这个还需要在
kernel/bpf/verifier.c具体实现相对应的鉴别方法。
3.4 如何验证项目功能?
关于验证问题可分为内核态的函数修改和用户态的函数修改:
内核态:可以利用自己编写内核模块的方式,通过
EXPORT_SYMBOL_GPL将特定函数暴露出来,然后再通过我们的接口挂载上去进行修改并且验证。用户态:用户态的函数验证还是比较简单的,类似于uprobe,比如可以指定相关进程的PID,直接挂载上去进行验证返回值或者入参。
4. 项目开发时间计划
| 日期 | 任务 | | :-----------: | :----------------------------------------------------------- | | 07/01 - 07/15 | 课题的前期准备工作,寻找相关的函数点 | | 07/15 - 07/31 | 设计相关的分支逻辑 | | 08/01 - 08/14 | 编写相关的自定义函数,并放入内核编译测试 | | 08/15 | 查看中期考核结果 | | 08/15 - 08/31 | 内核编译测试通过后,编写相关用户态测试代码 | | 09/01 - 09/15 | 设计其他功能,比如用户态的指定函数修改,指定内存地址修改,通过替换PC的方式替换函数 | | 09/15 - 09/29 | 整体项目代码测试以及撰写项目文档 | | 09/30 | 完成项目 |